Among the various components of fitness and conditioning as applied to the baseball player, strength and endurance have important roles in the big picture of a long season. It doesn’t matter whether you’re a freshman in high school or a rising star in Major League Baseball.
Here, we’re going to discuss three different types of workouts (tubing, physioball and mini-bands) that positively affect both your ability to maintain muscular strength over a lengthy period of time, if done regularly, 2 to 3 sets per exercise, and approximately 2-3 times per week.
Here’s a look at the workouts and how you can get started:
Tubing
(focusing on shoulder & scapular muscles involved in throwing)
The four “rotator cuff” muscles – Supraspinatus, Infraspinatus, Teres Minor and Subscapularis – are involved in throwing the baseball.
Because the shoulder joint is freely movable in any direction, it’s very susceptible to injury. This tubing workout will help protect these muscles, and can be done just about anywhere.
Tubing can cost anywhere from $7 to $20, depending on the quality.
Do these all in standing position (10-15 repetitions each):
1. External Rotation (90 degree angle) – Shoulder
Facing the fixed position of the tubing, position both arms with elbow bent at a 90 degree angle, palms of hands in a face down position. Rotate both arms upward until they are straight up vertical. Do not move the elbow up or down. Repeat the sequence through the desired number of repetitions.
2. External Rotation (Elbow in tight at hip) – Shoulder
Using one arm at a time, make a quarter turn, and position your elbow in tightly at your hip. Keep the arm straight while pulling the tubing across your body. Repeat the sequence through the desired number of repetitions.
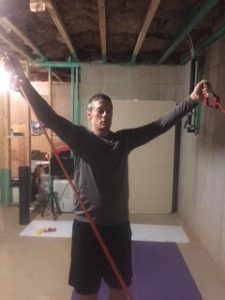
3. Y’s – Scapular
Facing the fixed position of the tubing, position both arms straight, thumbs up,and raise the arms straight up like the letter “Y” (approximately a 45 degree angle). Your elbows should remain locked out straight. Squeeze your shoulder blades (scapular retraction) as tight as you can for 2-3 seconds. Repeat the sequence through the desired number of repetitions.
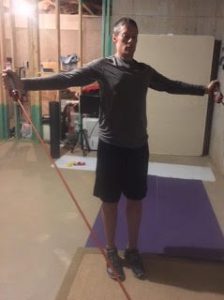
4. T’s –Scapular
Facing the fixed position of the tubing, position both arms straight, thumbs up, and move your arms straight out to each side of the body, like the letter “T.” Just like with Y’s, your elbows must remain locked out straight. Squeeze your shoulder blades (scapular retraction) as tight as you can for 2-3 seconds. Repeat the sequence through the desired number of repetitions.
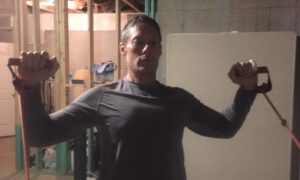
5. W’s – Scapular
Facing the fixed position of the tubing, position both arms straight up and down, elbows at a 90 degree angle, palms facing each other. Rotate each arm directly outward to the side, resembling the letter “W.” Squeeze your shoulder blades (scapular retraction) as tight as you can for 2-3 seconds. Repeat the sequence through the desired number of repetitions.
Physioball
This air-inflated ball presents an unbalanced environment. It is a next level progression in the exercise chain of command, and not for a beginner. The cost of a ball can range anywhere from $15-75 approximately, depending on the texture of the surface of the ball. Make sure you purchase an anti-burst labeled ball. Make sure it fully inflated. It is somewhat portable and can be used almost anywhere.
1. Hamstring Curls – 10-20 repetitions
Laying flat on your back, legs straight, heels on the ball, toes straight up, and lift your lower back off the ground. Curl the ball in and out (knee flexion and extension) from heel to toe with both feet. This exercise focuses on the hamstrings as well as the lower back muscles.
2. Low Abdominals – 10-20 repetitions
A bit more advanced, lay on the ball in a flat to decline position (from head to toe), knees bent. You must be able to hold onto a sturdy object that can fully support your body weight. From there, raise your bent knees up together, contract your lower abdominal area, and then lower. Repeat the sequence through the desired number of repetitions.
3. Supine Ball Balance – 5-10 second per leg x 5 each leg
From a sitting position, walk yourself down on the ball until you are laying flat on your back. Make sure your lower back and glutes are off the ball, and only your upper back is holding you up. From there, raise one leg up at a time, balancing on the other leg for the desired time, alternating between each leg. Great for your glutes, lower back, and hamstrings. For best results, perform this near a wall or something that will help you balance during the exercise. Repeat the sequence through the desired number of repetitions.
Mini-Bands
These durable rubber bands are used primarily in the leg and hip area. They are extremely portable and can be absolutely anywhere. Certain sporting good stores sell these in packages of three (light, medium, and heavy tension) and cost about $20.00 per package:
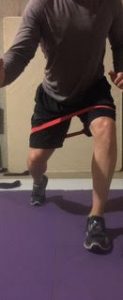
1. Monster Walks – Mark off a 5-10 yard area
Place the rubber band around either the hip (just above the knee) or around the ankles. Feet shoulder width apart. Exercise options are: forward, backward or side to side walking, always keeping a constand tension in your rubber band. Your knee angle can be slightly bent, or for more advanced users, try these with straight leg walks and even add a 2nd rubber band (you’ll have 1 above the knee and 1 at the ankle). Emphasized are the muscles of the front outer thigh, hips, glutes, and hamstrings. Repeat the sequence through the desired number of repetitions.
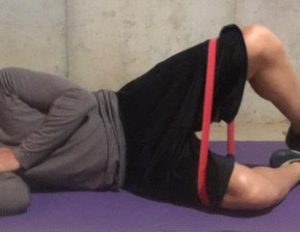
2. Side Lying Clamshells – 25-50 repetitions each leg
Lay on a floor mat on one side of your body, knees slightly bent, and place a rubber band just above the knees, around the hips. Move the leg that is off the ground, outward as far as the rubber band will allow. Great for all outer quadriceps and glute muscles that surround the hip joint. Repeat the sequence through the desired number of repetitions.
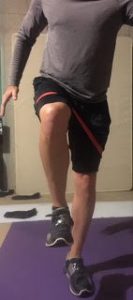
3. Resistive High Knee Running – Mark off 5-10 yard area
Work at a high intensity with some added resistance. Place the rubber band just above the knees and progress from slow to fast high knee running. Keep your time limit from 10-15 seconds maximum per exercise, when at highest intensity level. The rubber band will shift position on your thigh muscles throughout, so you will adjust it as needed. Great as a warm up or incorporate into your speed training session. Repeat the sequence through the desired number of repetitions.
The Wrap
To wrap this up, according to research from the National Strength & Conditioning Association (NSCA), SLEEP, though not a workout, is also critical to maintaining strength and performance in athletes as a recovery component. Lack of sleep can lead to such things as “poor performance, reduced motivation and arousal levels as well as reduced cognitive processes.”
This can result in “poor attention and concentration and heightened levels of perceived exertion and pain perception.”
Take this into consideration, as well as some of the workouts discussed above. It’s now time to put it all into motion.
___________________________________________________________________________
Roger A. Scott, MS, CSCS, RSCC, is the founder of the Atlanta Sport Science Institute, a former Strength and Conditioning Coach in the Cincinnati Reds, New York Mets, and Chicago White Sox organizations. If any questions regarding these or any other baseball training exercises and programs, contact him at 404-803-0222 or at roger.scott2626@gmail.com. Our website is www.dynamicsportsystems.com.
Leave a Reply